Installing SSL Certs With Certbot On Ubuntu/Apache
![]()
I’m a big fan of the Electronic Frontier Foundation and their initiative to encrypt the the entire web is not only ambitious, but one that I support! If you’ve never heard of Certbot before, it’s an open-source server tool created by the EFF to help site owners install and renew SSL/TLS certificates offered by Let’s Encrypt, a CA offering free certificates. Let’s Encrypt certs are cool because they’re free, open (as in, the open web kind of open) and automatically installable using the ACME protocol. Certbot is an ACME client program so Certbot helps you automatically install certificates over ACME. It takes a little bit of learning up front but once you see how it works, it’s a super easy (and super free!) way to help secure your website.
After hearing from a few friends who have had success with Certbot, I decided to give it a go for myself here on bmarshall.ca. It went pretty well, so today I’m writing up my experience. Onward!
Installing Certbot
First of all, Certbot is a command-line program that runs on your web server. You install it via whatever means you normally use to install software on your server. In my case, I’m on Ubuntu so I installed via Apt but Certbot is available in a head-spinning number of package managers so no matter your OS, there is likely an established way of installing on your server. Use the dead-simple form on their homepage to choose your OS and distribution and they’ll give you instructions on how to install. I chose Apache + my version of Ubuntu and got this:
$ sudo apt-get install software-properties-common
$ sudo add-apt-repository ppa:certbot/certbot
$ sudo apt-get update
$ sudo apt-get install python-certbot-apache
This installs some common Python libraries needed for Certbot to run (Certbot is written mainly in Python). It then adds the certbot PPA repository to your system and installs Certbot from it. Congrats! You’re done (well, installing, anyways 😜).
Usage
Certbot can do one or both of two things:
- Install certificates from Let’s Encrypt onto your server
- Configure your web server to used said certificates
The newly-installed certbot command will walk you through the process of doing both in one shot:
$ sudo certbot --apache
Certbot configures your web server by automatically finding and opening up it’s config files (usually .conf files containing <Virtualhost> directives). I found this worked pretty well – more on this later – but if you’d prefer to perform your own web server configuration manually you can instead run this command:
$ sudo certbot --apache certonly
I almost opted for this route because I generally dislike when scripts try to open my configuration files and muck about in them. But, for this I let Certbot handle it because it reduces the chance of me messing up pointing Apache to the certificates and winding up with a broken SSL setup. Plus, the whole point of Certbot is that it’s supposed to be able to renew certificates automatically so I decided to let Certbot go ahead and configure Apache for me since it may need to later anyways.
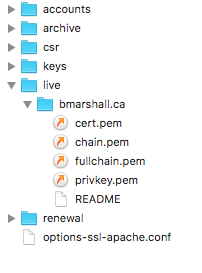
After walking through the steps prompted by the certbot command, you should wind up with a set of certs in /etc/letsencrypt/live/ for each virtual host you selected during the process. Each set gets neatly tucked away in it’s own subfolder using the ServerName from each virtual host as the subfolder’s name. The files in these subfolders are the certs Apache’s conf files will need to point to.
If you let Certbot configure Apache for you, Certbot will duplicate each of the .conf files in Apache’s sites-enabled folder. I had bmarshall.ca.conf so it created a second file right next to it called bmarshall.ca-le-ssl.conf. The new file contained everything from the original .conf file (the entire <VirtualHost> block), only the new file’s <VirtualHost> block was bound to *:443 instead of *:80. So, the new file defines how your site is served over HTTPS and the old one is for HTTP only. Certbot also added in a couple of extra directives in the HTTPS file – the pointers to the certs themselves:
SSLCertificateFile /etc/letsencrypt/live/bmarshall.ca/cert.pem
SSLCertificateKeyFile /etc/letsencrypt/live/bmarshall.ca/privkey.pem
Include /etc/letsencrypt/options-ssl-apache.conf
SSLCertificateChainFile /etc/letsencrypt/live/bmarshall.ca/chain.pem
If you’re eagle-eyed, you’ll notice it also sneaks an additional apache .conf file in there containing some basic SSL and logging settings.
Nice! Now Apache can serve my site over HTTPS using the certificates installed from Let’s Encrypt. Once you reload the server, the new configuration takes effect and, barring any issues, you should have a site with a valid cert installed! I did run into a couple little bumps along the way though, so…
Apache Gotchas
This was the first HTTPS site I’ve set up on this server so one thing I ran into while running $ sudo certbot --apache was that I didn’t have mod_ssl turned on. This is obviously pretty important but I thought Certbot might enable it for me. That’s not the case though – Certbot’s configuration abilities I believe are limited to editing the .conf files. Maybe it would have uncommented a line that includes the module if I had such a line in my main Apache conf, but my server’s modules are broken out into mods-available and mods-enabled folders. In my case, manually running sudo a2enmod ssl enabled the module. Don’t forget to restart Apache!
Another issue I had was that I originally had a couple of <VirtualHost> blocks contained in a single file. One was for my main site and one was for a subdomain of the same site. They kind of logically belong together and as far as Apache is concerned, both virtual hosts will get loaded fine that way. But, Certbot didn’t seem to like that and
gave me a pretty cryptic error. Once I broke these files out into two separate .conf files though, Certbot was
able to successfully update them.
The nice thing I found was that if I ran Certbot and there were any errors at all, it would immediately undo any changes it had made and get the heck outta there, leaving files exactly as they were before running the command. This was super nice because you don’t want it leaving anything half-done or broken in a live server environment. If Apache can’t be
correctly configured, Certbot leaves your configs the heck alone. It made me feel confident that running the
certbot command wasn’t likely to blow anything up. That’s a very underrated trait of good command line
programs in my opinion.
Renewing Your Certs
Certbot helps you renew your certs as well – I haven’t dug into this too deeply yet because my certs aren’t set to expire for a while. Let’s Encrypt certs are issued for 90 days so after that time period you have to either manually run certbot renew or you can set up a CRON job to run certbot renew on a schedule (daily perhaps). I’ll probably set this up soon but I want to try manually renewing first so maybe I’ll come back and update this post once I try that out.
Going Forward
Hopefully this has whet your appetite for free and easy to set up certificates! I really want to see the barriers to setting up SSL on the web lowered substantially over the next few years as HTTPS Everywhere gains more traction and more of the web starts using HTTPS by default. This seems like a fantastic step in that direction. I’ve really only scratched the surface of what Certbot can do here so read their excellent documentation to learn more.
Resources:
Certbot
https://certbot.eff.org/
Electronic Frontier Foundation
https://www.eff.org/
Let’s Encrypt
https://letsencrypt.org/